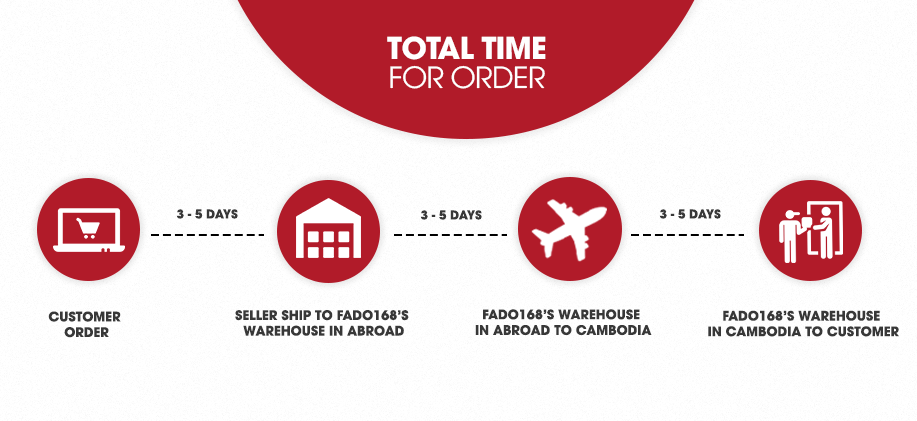
Timer Relay, Icstation DC 12V Time Delay Switch 10A Timer Switch Module Programmable Digital Time Cycle ON-Off Control 0-999s/min/h LED Display Time Relay Switch Module for Light Water Pump Engine
Wide Time Range: Icstation digital cycle timer relay delay module with time ranging from 1 second to 999 hours.
Dual LED Display: On-board dual green-red LED display module and tactile push-button, which is easy to set the delay time and working modes(Red readout for practical value(PV); green readout for set value(SV).
Support multiple types of working mode including timing, cycle and cycle working modes meeting your most demands
Mounting Size: 71 X 40 X 24mm/2.79 X 1.57 X 0.94 inch (L*W), Compatible Load: AC 250V 10A / DC 30V 10A
User can view and download English User Manual on the Amazon Page at Technical Specification or under the IMAGES.
Product Specifications
Product Dimensions: 2.79 x 1.57 x 0.94 inches
Item Weight: 1.45 ounces
ASIN: B06X3YSXY9
Item model number: 12V 1CH Digital Delay Relay Timer Module
Customer Reviews: 4.0 out of 5 stars 357Reviews
Is Discontinued By Manufacturer: No
Date First Available: February 18, 2017
Screen Size: 2.39 Centimeters
Manufacturer: IS
Product Information
Product description
ICStation Digital Cycle Timer Delay Module
ICStation digital cycle timer delay module with settable delay time ranging from 1 second to 999 hours. On-board dual green red LED display panel and tactile push button easy to set the delay time and working modes, various functions including timing, cycle and time delay modes perfect for automatic power control or DIY projects. Mounting Size: 71 X 40 X 24mm/2.79 X 1.57 X 0.94 inch (L*W), Compatible Load: AC 250V 10A / DC 30V 10A.
P0--0: T1 timing for Seconds (0-999s).
P0--1: T1 timing for Minutes (0-999m).
P0--2: T1 timing for Hours (0-999h).
P1-0 Load is off until (T1 or PV) time counts down to 0 then the load will come on and stay on.
P1-1 The load comes on as the power button is pressed. After PV Time the load will go off.
P1-2 The load is off for (T1 or PV)(delay time) then the load switches on and runs for the time set in (T2 or SV) then switches off until power switch is pressed to cycle again.
P1-3 Load is on until PV Time runs out Then after SV time runs out the load will come on and stay on.
P1-4 Load is off until (T1 or PV)(Delay) time counts down to 0, then load comes on until SV time counts down to 0 then the load is off then it cycles again and again-auto cycle.
P1-5 The load is on until (T1 or PV) time counts down to 0 then powers down and after (T2 or SV)Time counts down to 0 the load will start working and cycle again and again-auto cycle.
2 kinds of wiring diagrams
Simple instructions:
Please pay attention for your first use. You need wait 6s after your setting data, the module will save the date you have set after 6s.
Short press button “SET”: Start the Time Setting Mode and screen will blinking. Please set time T1 during blinking. Press button “SET” and screen will blinking again. Set time T2 during blinking. Then save set in two method: Waiting for 6S and the screen stop blinking. The system automatically saves the setting time; Press button “SET”.
Long press button “SET”: Start the Parameter Setting Mode. There are two parameters for your choice: P0 and P1. You can select P0 or P1 by short press “SET”. Under the parameter P0, P1 you can set the parameter by the button UP and button DOWN.
Restart key: Trigger the function again. After the timer finishes work normally. If needs to work again please short press the 'Restart key' to restart the timer.