ROOFULL A41-SU USB 3.0 & USB-C External CD/DVD Drive for Mac PC - Sleek, Durable, and Multifunctional
If you're looking for a sleek and durable external CD/DVD drive for your laptop or Mac, the ROOFULL A41-SU disc drive could be a great choice. With just a single USB cable, you can enjoy the same freedom to read and write CDs and DVDs on your modern laptop as you once had with built-in drives.
Whether you're revisiting your collection of music CDs from the '90s, watching classic movie DVDs, burning music, videos, or photos to blank discs, or digitizing tracks and footage from commercial discs into MP3, WMA, or MP4 files for your computer or phone—the A41-SU handles it all quickly and reliably. You can also view photo CDs, install software, games, or operating systems from discs, or back up important files for long-term storage or sharing.
In addition to its full CD/DVD read/write capabilities, the A41-SU features built-in USB 3.0/2.0 ports, allowing you to connect other USB-A peripherals like a wired/wireless mouse, keyboard, Bluetooth receiver, or flash drive, without taking up valuable ports on your computer. The SD card slot makes it easy to transfer videos and files from your camera, camcorder, or other compatible devices.
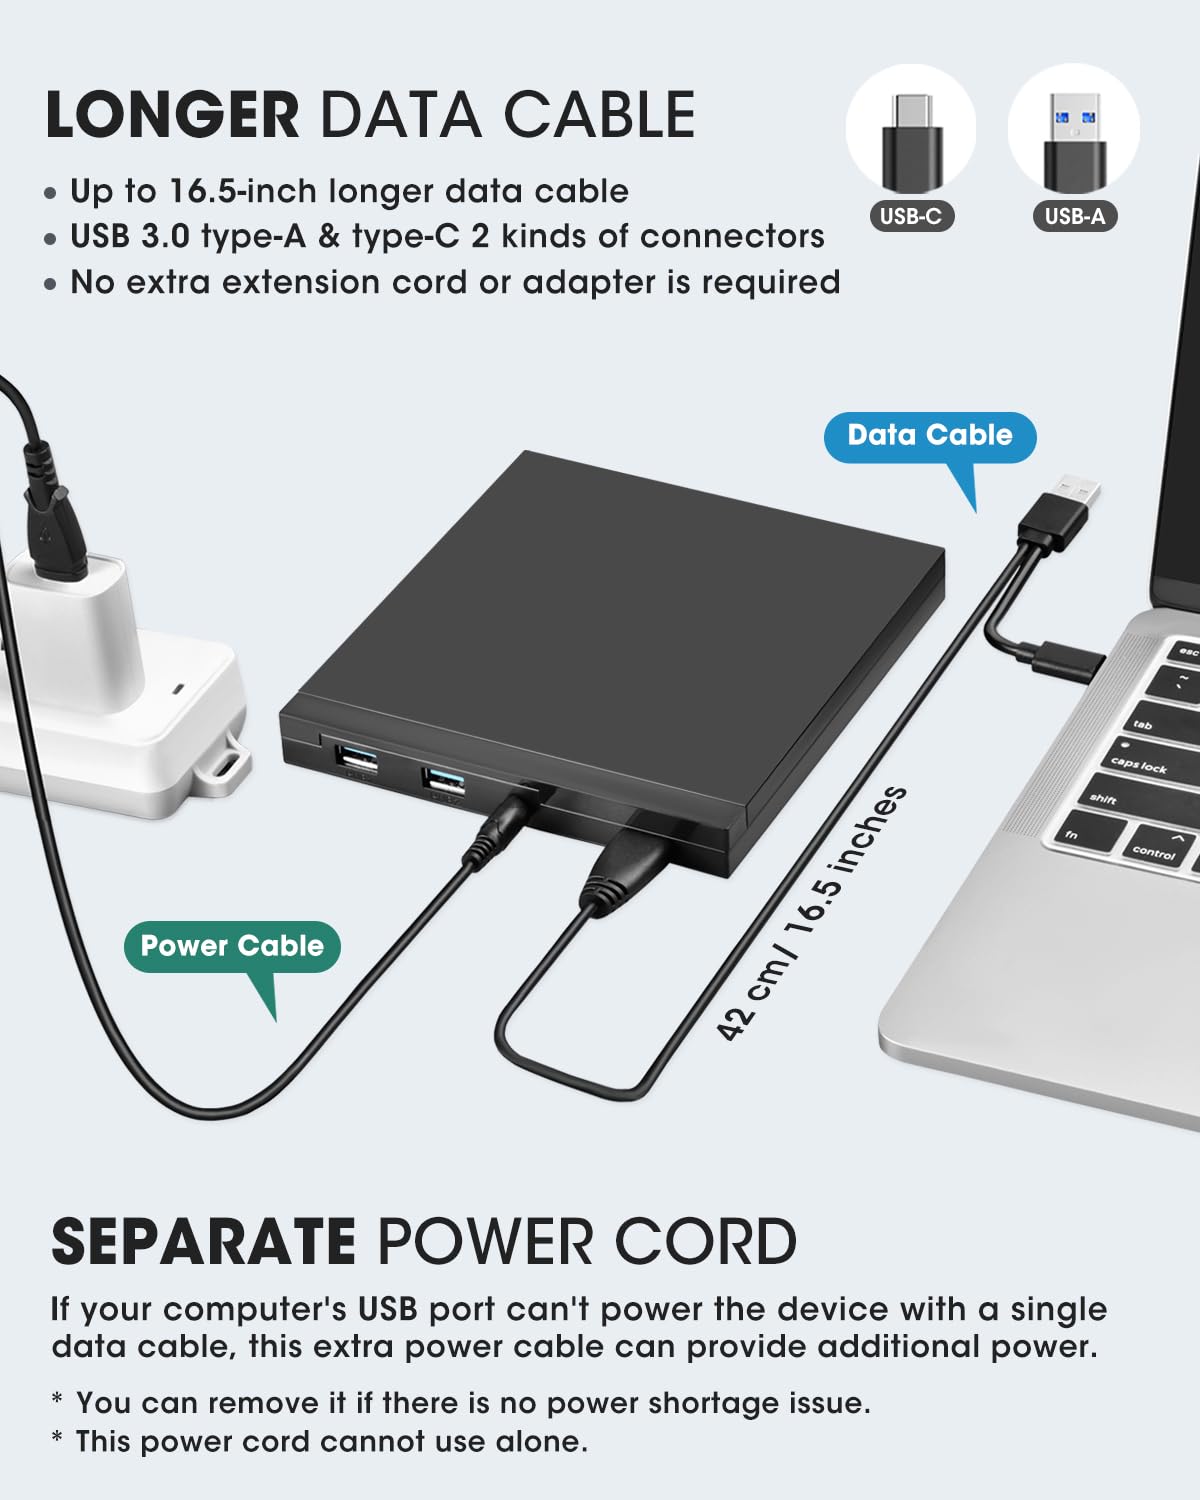
It comes with a longer, detachable data cable that has both USB-A and USB-C connectors on the end, so you can plug it into a wide range of laptops, desktops, or all-in-one PCs without needing any extra adapters. Just plug the cable into your computer's USB port, and the drive will be recognized automatically. Then simply insert your CD or DVD and use your preferred media player, burning, or ripping software to read, burn, or copy your disc. No complicated setup required, plug and play! (Scroll down for our recommended software and usage tips, also included in the user manual.)
True USB 3.0 Performance & Supported Disc Types & Max R/W Speed
Unlike other drives that falsely claim to be USB 3.0 (but are actually USB 2.0), our CD/DVD drive burner features a true USB 3.0 solution with a genuine 9-pin connector and fully implemented data lines, backed by a dedicated USB 3.0 PCB design and controller IC. It delivers data transfer speeds of up to 5 Gbps (approximately 10 times faster than USB 2.0) and supports maximum read/write speeds of 24x for CDs and 8x for DVDs, ensuring smooth, efficient performance.
Supported Disc Types: Support the reading, burning (writing/rewriting), and ripping (digitizing) of multiple disc types, including CD-ROM, CD-R, CD±RW, DVD-ROM, DVD-RAM, DVD±R, DVD±RW, DVD±R DL, VCD, and SVCD. (Blu-ray, 4K, and some M-discs are NOT supported)
Max Read/Write Speeds: CD-ROM 24x, CD-R 24x, CD±RW 8x, DVD-ROM 8x, DVD±R 8x, DVD±RW 8x, DVD±R DL 4x. (Tips: The drive gradually increases speed from the inner to the outer edge, with a slower startup speed that reaches maximum performance as it progresses.)
What's the Burning & Ripping: When you copy music, pictures, and videos from your PC to a blank CD or DVD, it's called "burning." When you copy music, pictures, and videos from a CD or DVD to your PC, it's called "ripping."
Recommended Burning & Ripping Speed: While the maximum read/write speeds for CDs are 24X and 8X for DVDs, we recommend burning or ripping at 10X or lower for CDs, and 4X to 8X for DVDs. Slower speeds, such as 4X or 8X, are ideal for ensuring data integrity, especially with high-capacity or dual-layer discs. These speeds enable more precise data encoding, reducing the risk of read errors.
About Audio & Video Format: Before burning an audio or video disc, make sure the multimedia format is compatible with the blank disc, otherwise, the burned disc will not play properly. You can use software (such as HandBrake or Freemake Video Converter) to convert video files to DVD-compatible formats (e.g., MPEG-2) or audio files to CD-compatible formats (e.g., WAV or MP3). If you're burning a data CD or DVD just to store files (like saving them as you would on a USB drive), it can hold any audio/ video image format.
Other Notes Before Burning: In addition to the speed and media format, before burning an audio or video disc, make sure your blank disc capacity is sufficient, use the right burning software.
About Photo/Image Discs: Some photos cannot be viewed or downloaded on Mac and Windows due to incompatible disc formats, unsupported image files, copy protection, or disc damage. Both systems support JPEG, PNG, TIFF, BMP, GIF, HEIF, and most RAW formats, but some RAW files may need Preview, Photos, or third-party software to open.
Compatibility, Incompatibility, Usage Steps, and Recommended Software
Compatibility: This USB external CD DVD player works with laptop, desktop, and all-in-one PCs running Windows (11, 10, 8, 7, Vista, XP) and new Linux OS, as well as Apple MacBook Pro, MacBook Air, iMac, Mac mini, and Mac Studio with 10.16 & later macOS (Including M1/M2/M3/M4 chipsets).
Incompatibility:Not working with Chrome OS (Chromebook), TVs, cars, trucks, projectors, tablets, iPads, phones, PS4/5, Xbox, Nintendo Switch, and cannot play Blu-ray/ 4K discs.
How to Use it on Windows Computers: Prepare the media player, burning, or ripping software based on your needs (not all), and network connection (for Windows 11) > Plug the USB-A or USB-C connector on the data cable into your computer's USB-A or USB-C port directly or a self-powered USB hub. If needed, connect the power supply cord to a USB power adapter or bank to ensure sufficient power supply > It will install the driver automatically and you will see a DVD RW icon in Windows Explorer > For video DVDs, set the region code to number #1 to play US or CA DVDs (CDs do not have region code) > Insert your CDs or DVDs > Use the software you’ve prepared to play, burn, or rip the disc > After playback/burning is complete, you can press the button on the panel or right-click the icon to eject the disc.
Recommended Free Software for Windows: Audio CD Media Player (Windows Media Player, VideoLAN VLC Player); Video/Movie DVD Media Player (VideoLAN VLC Player, Kodi, 5KPlayer); Audio CD Burning Software (CDBurnerXP, ImgBurn); Video DVDs Burning Software (ImgBurn, BurnAware Free, CDBurnerXP); Audio CD Ripping Software (Windows Media Player, iTunes, Exact Audio Copy [EAC], Fre:ac); Video DVD Ripping Software (HandBrake, MakeMKV)
How to Set the Region Code in Windows: Right-click the "DVD-RW Drive" icon and select "Properties" > Go to the "Hardware" tab and select your CD/DVD drive > Click "Properties" at the bottom > Open the "DVD Region" tab > Choose the correct region (e.g., USA and CA is 1) and click "OK". (Note: You can only change the region code 4~5 times.)
How to Use it on Apple Mac Computers: Open Finder > Settings (or Preferences, depending on your macOS version) > Ensure "CDs, DVDs, and iOS Devices" is checked in the General Tab and Sidebar Tab if available > Prepare the media player, burning, or ripping software based on your needs (not all) > Take out the data cable (located under the drive) and plug it into your computer's USB-A or USB-C port directly or a self-powered USB hub. If needed, connect the power supply cord to a USB power adapter or bank to ensure sufficient power supply > Insert your CDs or DVDs > Your Mac will recognize the drive, read the disc and an icon will appear on the desktop > Use the software you’ve prepared to play, burn, or rip the disc > To eject a disc on Mac computers after playback/burning, right-click on the desktop icon and select "eject," or choose "File" > "Eject" from the menu.(Note: The tray cannot open via the button due to macOS limitations)
Recommended Free Software for Apple Mac: Audio CDs Media Player (Apple Music, iTunes, VLC Player); Video/Movie DVDs Media Player (VideoLAN VLC Player, Apple DVD Player); Audio CDs Burning Software (Apple Music, Burn, Express Burn); Audio CD Ripping Software (Apple Music, X Lossless Decoder, HandBrake); Video DVDs Burning Software (Burn for Mac, HandBrake, iDVD (Legacy), DVDStyler, iDVD [for old mac]); Video DVD Ripping Software (MakeMKV, HandBrake with VLC - Use VLC to read the DVD, and HandBrake to convert and rip it to your desired format).
Note Before Burning Discs: Before burning an audio or video disc, make sure your blank disc capacity is sufficient, use the right burning software, set the recommended burning speed (10X or lower for CDs and 4X to 8X for DVDs), and the multimedia format is compatible with the blank disc, otherwise the burned disc will not play properly. You can use software (such as HandBrake or Freemake Video Converter) to convert video files to DVD-compatible formats (e.g., MPEG-2) or audio files to CD-compatible formats (e.g., WAV or MP3).
Troubleshooting Steps
[Windows OS] If your Windows computer recognizes the optical drive, you can see the DVD RW icon in Windows Explorer. If your Windows laptop PC cannot recognize this CD/DVD drive, please try the following suggestions:
1. Use the Type A and Type C cables on the back (bottom) of the optical drive to connect your computer's USB port or a self-powered USB hub. For Windows 11/10, please make sure a network connection and a media player software (Such as Windows media player for audio CDs, VLC player for audio CDs and video DVDs)
2. Try different USB Ports: Move the data cable to different USB ports on your computer.
3. Reinstall the driver: 1. Right-click the Windows Start Button in the lower left corner of the screen, or press the Windows Logo + X key combination on the keyboard, from the list, and click to select Device Manager. 2. Click View. 3. Click Show Hidden Devices. 4. Fine this DVD/CD-ROM drive or a similar name. 5. Right-click and select Uninstall. 6. Reboot your computer and replug the external drive, Windows will detect the drive and then reinstall it. If it is not solved, reach out to us for a driver troubleshooting tool, the download link is not allowed here.
[Windows OS] This drive supports CDs and DVDs. If this drive can only play audio CDs but cannot play video/movie DVDs on your Windows PC, please try the methods below:
1. Use the right media player software (such as VLC player). Some media players, such as Windows Media Player, cannot play video DVDs.
2. Before playing video DVDs, please set the region code to number 1 to play the U.S. or CA DVDs. Steps: 1. Right-click the "DVD-RW Drive" icon and select "Properties". 2. Go to the "Hardware" tab and select your CD/DVD drive. 3. Click "Properties" at the bottom. 4. Open the "DVD Region" tab. 5. Choose the correct region (e.g., USA is 1) and click "OK". (Note: You can only change the region code 4-5 times.)
[Mac OS] The Mac computer will show the device icon after the disc is placed in the optical drive. If your MacBook, iMac, or Mac Pro/Studio cannot recognize this CD/DVD drive, please try the following suggestions:
1. Open Finder > Settings (or Preferences, depending on your macOS version) > Ensure "CDs, DVDs, and iOS Devices" is checked in General Tab and Sidebar Tab if available.
2. The Mac OS computer will not display the device icon until the disc is placed in the optical drive and the disc is read successfully.
3. Move the data cable to different USB ports on your mac computer, and try different discs.


 Contact


